In my recent blog post, I showed you that the resin viscosity and printer’s poor construction are the main reasons why people observe print failures. I also highlighted that the same phenomenon causes the elephant foot. However, I did not give you a step-by-step guide on how to work around it. I’ll fix this in this blog post, where I show you how to use UVTools to post-process your sliced files in order to get the perfect bed adhesion and no elephant foot on your prints.
If you haven’t read the blog post, read it. If you are in hurry and you just want to quickly “solve all your problems™”, I give you a brief recap.
Why Is There Elephant Foot?
Most people claim that it is caused by overexposure. However, that is not entirely true. Some of the elephant foot is caused by overexposure, however, people observe much large elephant foots that it is possible only by overexposing. Also, the elephant foot seems to be larger on the larger printer.
The main reason is that the printer is squeezing out resin during the exposure. To squeeze resin into a 50 µm layer takes a lot of force. Unfortunately, most of the printers have relatively weak construction (do you remember people going crazy about Mars 3 Z-wobble?) therefore, when the build plate moves into the resin, the printer flexes. Therefore, the resulting layer is thicker and even when the exposure starts, the build plate pushes down and squeezes resin. Since the resin is already curing, bits of partially cured resin get squished out, and thus, you get a big elephant foot.
So the goal here is to start the exposure once the build plate settles in position. In that case, no resin is squished out, the layer has a correct height and therefore, you need lower curing time for the bottom layer and you get no elephant foot. Easy as that.
Without any feedback on whether the build plate is moving (e.g., using sensors like I did in my blog post), we have only one option – just wait. There is already a resting time feature in the slicer, however, it has one problem – when you set to all layers, your prints will take an eternity to print. You only need to set it to the first millimeter of your print. And you can’t do that in Lychee nor in Chitu slicer.
What is Wrong with Slicer Compensation?
You might object that slicers already have compensation for that built-in. So why bother? Well, if I omit the fact that having thick base layers causes layer adhesion, the compensation is not perfect. And it cannot be. You will always lose details. You cannot print nice and thin features with the compensation.
One viable approach would be multi-exposure, i.e., first, expose the inner, heavily compensate layer. The layer has an offset of 1 mm, so no squished resin gets beyond the intended perimeter. Then, without lifting, expose a second, precise pattern with regular exposure to get the precise perimeter. However, the current slicers and formats are not able to do multi-pattern exposure.
The Goal
To recap what we need to achieve in our sliced file in order to stick properly and have no elephant foot:
- 1-3 base layers with high exposure (1.5-3× the normal exposure) and long rest times before starting the exposure (20+ seconds). We discuss the length of the rest time in a moment.
- 20 layers with normal exposure and long rest times
- rest of the layers with normal exposure and no rest times
You can clearly see that nor Chitu, nor Lychee can do this. They only distinguish between the base and normal layers. Fortunately, UVTools will save us!
There is one aspect of leveling the build plate. To make the whole process work nicely if you have precise layer height. That means that you should level against empty resin vat. No resin inside (as it will push the build plate away), no leveling paper. Leveling cards are snake oil introduced by the printer sellers: people called for it, so the manufacturer gave them something. People are happy and nobody cares that the whole procedure is just wrong. The same goes for setting Z=0, there is no need to do so whatsoever. You just need precise layer height. That’s all. Also, there is no need to relevel in my experience unless I change the LCD.
The rest times are based on my observation of forces during printing (as described here) for Saturn. Smaller printers can probably work with less time, bigger ones will probably need more. Similarly, resin viscosity plays a role. A thick resin will probably need bigger rest times. I can get away with about 5 second rest times with Siraya Tech Simple, I need 40+ seconds for Siraya Tech Sculp or Mayer makes resin. Colder environments yield thicker resin, so they also increase the rest time needed. Feel free to experiment here.
The Manual Way and What’s Wrong with It
In the original post, I introduced a procedure for manual adjustment. I set a high light-off delay in the slicer, let the printer print for 1 or 2 millimeters and then I change the light-off manually via the gear icon on the printer. I was notified by my readers that the procedure doesn’t work. Indeed, it does not. I was running my Saturn with ancient firmware using the old Chitu format. Once I upgraded my Saturn to the newest firmware, so I can use it with Chitubox 1.9, the gear icons stopped working. Also, it seems that the new firmware completely started to ignore the rest times for the first layer – the most important one! Therefore, there is a need for the automated procedure…
Automatic Post Processing with UVTools
There is a tool called UVTools developed by Tiago Conceição. It is a wonderful tool that supports many file formats for resin printers and allows you to modify them, e.g., merge multiple files, adjust exposure without the need to reslice, and more. You should give it a try.
08/2022 UPDATE: The functionality is part of the UVTools 3. The guide below doesn’t work in it. Please, follow the updated guide.
I reached out to Tiago and he wrote a plugin for UVTools that can adjust the rest times just as we need. The usage is pretty simple (there is an image step-by-step guide below).
- Download and install UVTools from https://github.com/sn4k3/UVtools/releases
- Prepare a slicer profile:
- set 2-3 base layers
- set base exposure to 1.5-3× the normal exposure
- use no transition layers
- set wait mode to rest times
- set all rest times to 0
- Slice your model
- Open the sliced file in UVTools
- Go to Tools -> Scripting and select the following script (you have to dowload): ScriptZDebanding.cs
- Enter the parameters and hit the “Scripting” button
- I usually use the safe debanding height of 1 mm
- Rest time before cure on the debanding area to 20-40 seconds
- I set no or 1 second rest times for the normal layers
- Save the file and you are ready to print!
Note that UVTools adds a first, empty, layer to overcome the limitation of the printer where all rest times are ignored for the first layer. So if your printer moves down, blicks, and moves up, that is all right.
Here’s the promised step-by-step image guide:

These are the settings in the Chitu Slicer. Be sure to select wait mode to rest time and set it to 0. I also suggest you to increase the lift distance - I have installed a special film instead of FEP, thus, my lift distances can be smaller. You can do so similarly in Lychee. Slice the files and save it.

This is the basic window of UVTools

Open the sliced file.

It takes a while.

Once it is loaded you can see the layers preview.

Go to the menu a select scripting.

Load the debanding script you downloaded earlier.

Set the desired parameters and hit "Scriptng"

The first layer is dark - this is OK. UVTools adds an extra base layer to overcome some firmware limitations.

If you move one layer up, everything is there. Now save it and print it.
Note that debanding will prolong your print by roughly 15 minutes. This is the time spent waiting in the first millimeter. That’s all you pay for this solution.
The Results
I use this procedure for a quite long time and it works perfectly. No problems with sticking, no problems with elephant foot, no problems with having a hard time removing the prints when they stick too much.
I have picked a few examples that demonstrate how effective the procedure is. First, I can print parts with a tiny base directly on the build plate. They stick just enough – the prints are nicely straight and removing them gives you real pleasure. The base is 35 mm × 1.3 mm which is more than enough. Printed in Siraya Tech Fast White, 2.6 seconds normal exposure, 7 seconds base layer. The first millimeter was debanded with 30 seconds on my Elegoo Saturn.

The prints are attached to the build plate only via a small surface. Yet they all turn out perfect.

More perfection

See - no elephant foot.

See - no elephant foot.

See - no elephant foot.
This is how satisfactory is to remove the prints from the build plate:
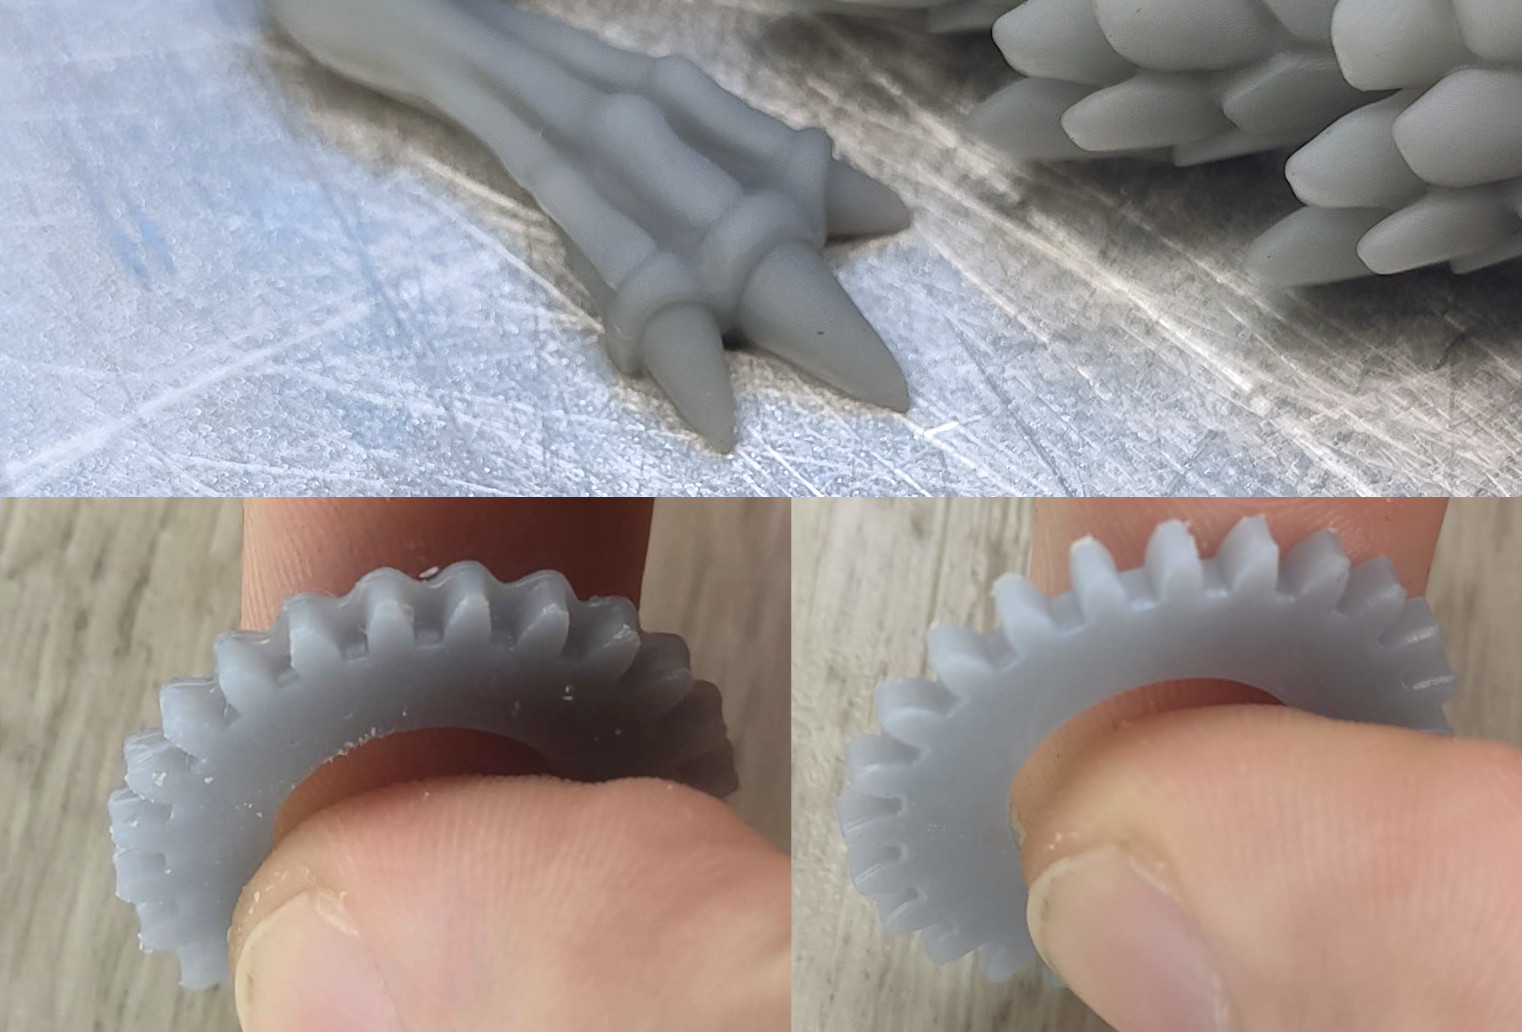
Second, I picked the recently famous articulated dragon model. People go crazy on TikTok, Youtube and Facebook groups with how hard is it to print it correctly, they claim it is impossible to print it on build plate remove it in a single piece. Well… it is certainly possible. This model is printed at 60% scale – therefore all tolerances and clearances are much tighter than intended by the designer. There is no elephant foot. Removing is quite easy. I was afraid of breaking the fingernails, so I was careful, but there wasn’t a single problem. I could have removed it more drastically. Everything moves nicely – except for the legs, where choosing Siraya Tech Fast Gray wasn’t the wisest choice as it has a tendency to cross-layer curing, therefore, it bridges badly. But after a careful push, even the legs started to move.

60% scale of the dragon

Printed directly on the bed

No elephant foot.

No elephant foot.

No elephant foot.

No elephant foot.

Removing it from the build plate was easy.
Here’s the removal procedure:
The last demonstration of removing the elephant foot, and the most notable one, is the demonstration of a simple M1 spur gear (Lego size). You can see the big difference between the standard procedure and the procedure with included rest times. The elephant foot is gone. Both gears were otherwise printed with the exact same settings.

The gears side-by-side - one with elephant foot one without

The gears side-by-side - one with elephant foot one without

Gear with debanding on the build plate

Gear without debanding on the build plate
Conclusion
I am confident enough, that the long-existing phenomenon of elephant foot on resin printers was solved. I have to admit, that all my previous attempts were just wrong (they basically implement the same approach today’s slicers use – see the old blog post and the other one). I hope the procedure above helps you to get even better resin prints.
There is still room for improvement. The script above is just pretty dumb. I plan to tackle blooming in the next iteration by adding delays to layers where a box is closed or a large cross-section is nearby. However, to do so I need to first gather some data in order to make the procedure as efficient, as possible.
If you like my research not only that I ask you to consider supporting me via the means stated below, but I also ask you to support Tiago – he did a ton of useful work on the UVTools. You can support him on GitHub or directly via PayPal.
Recent news: My open letter to the 3D-printing community
I love the 3D-printing community, but I think there is room for improvement. Let's get better in 2023! Read the full letter.
Support my work!
If you like my work (these blog posts, my software and CAD models) and you would like to see more posts on various topics coming, consider supporting me in various ways:
- You can become my sponsor on Github.
- If you prefer, you can also become my Patreon.
- You can buy me a coffee on Ko-fi,
- or you can buy something from my Tindie store (also see below),
- Or you can just share my work!
If you are interested in knowing what I am up to and recent sneak-peaks, consider following me on social media (Twitter, Instagram, Facebook).
My store offers
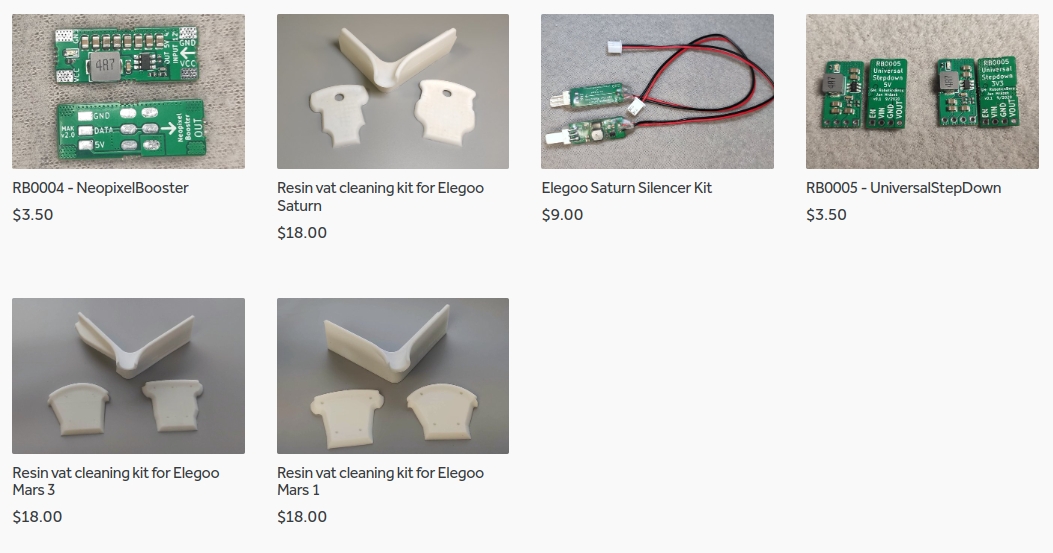
I launched new tank cleaning kits for Elegoo Saturn, Saturn S, Mars 1, and Mars 3. You can find them in my store.
Related Posts
- Multi-planar Slicing for 3D Printers – For Both FDM and Resin
- Open letter to the 3D printing community: Let’s be better in 2023! What should we do?
- Continuous Printing On LCD Resin Printer: No More Wasted Time On Peeling? Is it possible?
- About the Successful Quest For Perfect MSLA Printer UV Backlight
Holy crap great read I’m excited to try and share it. 2 questions one you mentioned leveling. I also have Saturn. You saying you just use empty vat no paper underneath the vat for leveling?? Secondly regarding off light time if you have a big model, I’m printing a rectangle that’s 160×60 not hollow, should the rest time be more on the high end then like 30-40 seconds off??
Great post Jan, thanks! I shared our UVTools script we regularly use. It might give you some more ideas: https://github.com/sn4k3/UVtools/discussions/417
I’d really like to try that. But I’m not 100% sure what I have to set in Lychee for it to work. Any Idea? Or do I have to use Chitu?
If you use a printer that uses CTBv4 then you can use any slicer you want; UVTools is just post-processing to adjust some layer values.
I can’t online the script. I’ve looked up every wich way to get it but all I get is a text file that the softwhere doesn’t ecognie as a script please help
Downloaded not online.
You just have to make sure it has the “cs” extension, not “txt”. In the save dialog on Windows you have to select “Save as all files” not “Save as text file”
Hey, thanks for your work! The results on your pics look awesome! I have an Anycubic Photon Mono X and I used the same values as seen in your picture guide but I got NO adhesion to the plate. Is it right to set the bottom exposure time to 6 seconds. Is it even possible to get a proper adhesion? What could be my problem?
Thanks!
I tested the procedure on Elegoo’s printers that use CTBv4 file format. I already got some feedback, that Anycubic firmware ignores some of the per-layer attributes, so I am not sure if this particular script can be directly applied. I however don’t own any of Anycubic devices, so I can’t test it. The first thing I would try is to untick the “Add extra empty layer” in UVTools.
I tried with your values on my Anycubic Mono X and had the same result of no adhesion. I will try to do some tinkering and will report back with my results.
This sounds great… but the file format supported by the Mars 3 isn’t supported in UVtools for saving. Any suggestions?
and if u use chitu 1.9 for slicing and not chitu pro ? that work ?
I tried but it has the same issue.
UV Tools seems to be punishing the customers of the Chitu based printers by not allowing saving the new encrypted format. I’m as annoyed as anyone by the format encryption, but it’s the manufacturers fault, not mine. So anyone who has a printer that uses the new format is SOL and can’t use this solution, which is a bummer, since it seems great. Any other solutions?
Summary for anyone working with Lychee ctbv4 (encrypted) files with UVTools (v2.29.0 on PC)
UVTools will read ctbv4 files (required for printing on Mars 3).
UVTools File:Save As works if you make no changes to the ctbv4 file (pointless really or a rather long way to make a copy!)
UVTools File:Save/Save As do not work if slice file changes/repairs are made in UVTools as the author does not allow saving encrypted files.
However UVTools File:Convert To Chitubox CTB encrypted will convert and write the modified file to disk for printing.
Reading the Converted Encrypted file back into UVTools indicates it is indeed encrypted and that changes/repairs made in UVTools have been made to the slice file.
I’vw used Your recommended settings on Mighty 4K and some of the dental model water washable resin. I have a problem with adhesion to the build plate. I multiple the normal expousure by 3 and sometimes it works , sometimes prints fall off the build plate, totaly or partially. Should I extend bottom layers expousure some more? normal layer is 2,7 sec, bottoms I’ve set to 8,1. Initially I’ve set it to 7 sec but it was total disaster…Sorry for my english, it’s not my native language 🙂
Hi, great post and lots of usefull information you got here! 😀
I wanted to report that I have a Photon Mono, and unfortunately your scripting method doesn’t work with that printer. I did what you described, and then extracted file contents – and there’s no per-layer setting for rest times, there’s only one global variable for that, so it’s a no-go.
But!
I can simply enter the print settings directly on a printer, and there I can change rest time (it’s called “light off” there) among others, and it will be respected. So basically it can be done manually like you described – not an elegant solution, but certainly one that will work.
Tomorrow I’ll run some real test prints (I only checked if it works without a vat and build plate for now), and report back.
Hey, I’d like to hear of your experience and if you get successful prints. 🙂 I am very new to SLA printing and I don’t know where to start figuring out a solution for my Photon Mono X. Do you think if you found one for your Photon mono I could easily adapt it to my printer? Would be nice if you share it with us!
Thanks!
I guess it would depend on your printer’s firmware. If it allows changing rest time during printing, you could do it manually and I don’t see a reason it wouldn’t work.
You could remove your vat and build plate and print some dummy file (pretty much anything would do) and see if you can change the rest time on the fly, it should show after you click a gear icon during print (change it a lot, eg. if it’s set to 2s, then change it to 20 so it’s obvious when it works). If it works, then it would be a matter of figuring right exposure times for each resin you use and you should be good.
So, just to recap. have you updated your Saturn to the latest FW version? and are you using the latest version of CTB and this process is working ok?
o have not wanted to update my Saturn from its original version because i’m not sure i want to use the latest version of CTB, but if this wil be OK and you advise to install it i will…
This incredible, I printed one of those Dragons on 55% scale on my mars 2 pro with only 10 seconds per burn layer and it was perfect, everything moves and was easy to get off the plate. And almost no elephant’s foot.
Summary for anyone working with ctbv4 (encrypted) files with UVTools (v2.29.0 on PC) – I used Lychee Slicer v3.6.6 and printed on a Mars 3.
UVTools will read ctbv4 files.
UVTools File:Save As works if you make no changes to the ctbv4 file (pointless really or a rather long way to make a copy!)
UVTools File:Save/Save As does not work if slice file changes/repairs are made in UVTools as the author does not allow saving encrypted files.
However UVTools File:Convert To Chitubox CTB encrypted will convert and write the modified file to disk for printing.
Reading the Converted Encrypted file back into UVTools indicates it is indeed encrypted and that changes/repairs made in UVTools have been saved to the slice file.
The file modified by Jan’s script and converted to encrypted format will print on a Mars 3.
Thanks to Jan Mrazek and others on Lychee discord who helped me get this to work.
Good Luck.
So now those of you with Mars 3 (and I guess other printers tied to Chitubox hardware) can try Jan’s method for achieving prints without Elephant foot.
Good Luck.
Every time I attempt to load the script file, I receive this error message: The method “string ScriptValidate()” was not found on script, please verify the script. How to I fix this problem?
I am also having this problem, assistance would be appreciated.
Please, reach out to UVtools support group on Facebook – you will probably get assistance there more easily.
Unfortunately the support group wasn’t able to help. Thankfully, a new update of UVtools came out and it magically started to work. Why? Beats me.
Since the script is able to make a layer of zero thickness, wouldn’t it be possible to make a exposure finder that combines multiple resin times in one file?
Granted you would almost equal time as running all the tests in order, but printing only one piece and not cleaning several is an improvement from my point of view.
This is already possible with UV Tools. There is an exposure time calibration tool which you can use. You can even use your own model(like ameralabs town) instead of their flat test.
Hello Jan, thank you very much for this huge information !
On my side with a Saturn (v2) and the latest firmware, Chitubox 1.9.1 and your UVTools script it works very fine to print all on plate without elephant’s foot,
BUT the print miss ~1mm (one millimeter !) on the plate side (say on the “bottom” with Chitubox naming).
No scale issue, just dimension one : all seems to be like the print was cut off of 1 mm on its base…
I guess the reason can be Chitubox slicer take into account the resin expansion with bottom layers at 30s of UV exposure each while its Z is leveled with its cardboard and adapts its bottom layers slicing with this adaptation, but it is just thoughts :
could you verify and tell us if you have the right dimension on your Z axis for your prints with your process explained here ?
Chitu does no compensation. It’s again poor printers rigidity – the new version of Saturn suffer from the exact same problem as Mars: https://blog.honzamrazek.cz/2019/09/testing-the-precision-of-elegoo-mars-volume-5-whats-wrong-with-the-z-axis-and-how-to-fix-it-finally/
Brilliant. Thank you very much for all your help, Dear Jan !
Hello Jan, I come back with question and request 🙂
Could you give us an easy and clean way to correct the Z axis dimension missing with Saturn Printer ?
I have a printer which needs +0,86 mm over its Z=0 to be well calibrated (yes, almost 1 mm !) and to make pieces with the right Z dimension.
Maybe it is not only a rigidity problems (Elegoo support itself told me it was the miss of some internal pieces since designing)…
And the result is : needing + 0,86mm on Z=0 prevents me to use your anti-elephant foot process, because of course with this huge gap between the build plate and the FEP/LCD screen if I do not expose the bottom layers enough to make the resin grow to touch, nothing never even touch the plate !
So you understand I need more exposure time you advise, so I cannot use your complete and so brilliant process.
Do you have a solution ?
I don’t follow what you are saying exactly, but if it is that your machine thinks your build plate is 0.86mm higher than it truly is, could you not just make a spacer for your optical Z-stop?
I have a Mars 3 and just printed a spacer for the Wham Bam plate which I added to the original metal spacer. This causes the metal plate to be ~ 2.6mm lower than stock, and therefore the machine now knows the build plate will be 2.6mm lower due to the additional thickness of the Wham Bam setup.
For you, you could simply print a new metal spacer bit entirely. (I added a spacer to the existing setup). You can just cut the precise amount you want off the Z-stop dimensions and then your machine will not bottom out until the optical stop is activated by your adjusted 3-d printed Z-stop spacer.
Hopefully that makes sense. Also I realize it’s months since you posted this but maybe you’re still having issues and this might fix it.
I also miss 0.3mm on the bottom of my prints, as if it simply sliced off the bottom of my models and started the prints 0.3mm higher. I have a Sonic Mighty 4K. What could be the problem here? My prints stick and no elephants foot.
I’ve tried this method for the last few prints on my Saturn. The script is working, it adds the delays, but there is no reduction of elephant’s foot on finished parts. Maybe a very slight improvement but not enough to make it worth the effort. I’m going to try the built in Tolerance Compensation function in Chitubox since it can be adjusted separately for bottom layers, and it’s a lot more convenient to use.
If you haven’t tightened the screws holding the column on your Saturn you should probably do that. I own two Elegoo Saturn printers and basically every screw on both of them was loose from the factory. There are screws holding the column from inside, so you’ll have to take it apart to get all of them.
I have to re-level the build plate before every print. If I don’t I almost always get adhesion failure somewhere on the plate. I believe the issue is caused by the way the build plate attaches to the carriage, it is not an accurate or repeatable connection, so every time it’s removed it needs to be re-leveled. I have never had a failed adhesion after leveling the plate with the card stock before starting a print.
The script helps with removing the majority of the elephant foot I’ve been seeing, but there is a clear transition point/layer between where I stop the long wait periods and go directly into the shorter wait periods.
Is there a way to transition the debanding wait time to normal wait time?
Great tutorial! I use it all the time on my Saturn
I have one of the new Anycubic Photon Ultra dlp printer
I tried this tutorial but I don’t think it is working. I set the “Large debanding wait time before cure” to 40 seconds but when I watched the print happening there is no wait time that I am noticing.
Am I doing something wrong or is it because the file type is different? I can open it in UVtools.
I am afraid that Anycubic printers just ignore the resting time. Unfortunately, there’s no workaround I am aware of.
Aw. That sucks. 🙁 Thank you for the reply though.
I have Photon Mono, and there’s “light off delay” setting – and printer respects it – but it’s global, you can’t set it seperately for each layer – so I guess it may be a problem with specific model.
I have to manually change that setting during printing (it’s possible from printer’s menu) – not ideal , but it works and everything prints as it should.
Hello all, i have one of those Anycubic Photon Ultra dlp printers and i managed to make this workaround happen without UV-Tools, since the script sadly wont work with the Anycubic printer files. As Krzysztof wrote you can manually change parameters globally in the printer menu. For the Photon Ultra it’s the “exposure time off” parameter. I just changed it to 40 seconds for the first 50 layers and than revert back to 2 seconds .The exposure time for the 3 bottom layers were 6 seconds. I was able to print three articulated
dragons with 34%, 20% and 14% scale and got them off the build plate undamaged.
There is no obvious elephant foot on the models.
I have an early Elegoo Mars (motherboard version B) that cannot be updated to support Two-Stage Motion Control (TSMC) and resting time. I have to stick to the *.cdbdlp files as the printer does not accept *.ctb files.
My question is, will your script for UVTools work on *.cdbdlp files for my printer, or is it only for *.ctb files?
OK, I can answer this myself after having tried to use the UVTools script on a *.cdbdlp file. UVTools read the file and runs the script and seems to also modify the file. However, my Mars printer doesn’t take notice of the changes to the file. So apparently I have to stick to the “old” method of setting a large “Light-off Delay” value in CHITUBOX (1.8.1) and manually reduce the “Light-off Delay” after printing the first approx. 1 mm of the model. In my printer UI with the latest firmware (V4.2.20.3_LCDM 1440X2560 F2.9) the setting for “Light-off Delay” is called “Exposure Of” 🙂
UV Tools says the script is outdated no longer usable. How do you do it today?
The functionality is built into UVTools. It is available on the suggestions tab.
I feel more confused now, do i just use the values given to me in the program?
https://imgur.com/hqTwuvD ?
Does leveling against empty VAT still apply?
I’m fresh user of Elegoo Saturn S (after using FDMs for few years) and when printing flat on bed, I get HUGE elephant foot. I’m going to try UVTools (already using it to fix and find some other problems).
So, in regard to latest Chitubox firmware, Elegoo Saturn and latest UVTools with wait time suggestions/fix built in (no script anymore), my assumption is this:
1.) Level against empty VAT (without any other fixes to the motor mount, shaft etc)
2.) Burn in layers count: 2, burn in exposure: 6-8 seconds, lift say, 5 mm @ 70 mm/s
3.) UVTools:
Wait time before cure:
-Bottom height: 1 mm
– Wait time Bottom: 20 s – 40 s (depends on results)
– Wait time Normal: 1 s
– Transition layers: 8
Wait time AFTER cure:
-Bottom: 5 s
-Normal: 0 s
Is this correct? Thanks
Ok, so I have tried it today with VAT bed leveling and experimented a little bit with wait time for bottom layers. 20 s – MUCH better results, 25 s slightly better. Set to 35 s but had not tested it anymore as I had other work to do.
Anyway, elephant foots on Saturn S are almost completely gone, very small, almost invisible overlap can be attributed to longer exposition times for 2 bottom layers (8 seconds). I’ll try with 6 seconds.
But given how it was it’s night and day difference. Very happy with results. Yes, it takes longer to print. But heck, as I want to print transparent functional parts which was not possible on FDM at all and given the fact I can print 5 such parts in 45 minutes on Saturn (while barely having 1 in 30 minutes on FDM with much worse quality). Well heck yes!
It’s important to note, this method only works well if your bed is extremely level with your screen. One thing that I have never seen mentioned is that this might actually be impossible for some people due to the placement of the black sealant tape around the perimeter of their screen. If the tape covers any part of the screen where your build plate makes contact, you will create a small gap at that spot. For this reason, you should remove the tape, then do your leveling, then replace the tape with the build plate in it’s home position, making sure the tape is a good half a mm away from the edge of your build plate.
Fantastic article! Does UV tools work on Mac?
Workaround for Anycubic printers****
It’s not an ideal workaround, but it should work. First, the problem is that Anycubic firmware ignores the modified wait time for the intermediate layers (in between the Bottom and Normal layers). So one way around it is to split the file into two using UVtools, with the first file set to 20-40 sec wait times, and with all layers past 20 deleted. So this first file will print only the bottom 2-3 layers at long exposures with long wait times, followed by the 17-18 layers with normal exposure and long wait times. Then you edit the second file in UVtools so it will only contain all the deleted layers from the first file (the rest of the print), but you change the wait time back to 1 sec, and most importantly, set the z-offset to 1mm since the print needs to start where the first one left off.
Yet another alternative which is more yet even more cumbersome, is to just use a standard file with 1-2 wait times, and physically pause the printer for 20-30 sec using the UI for the first 20 layers. Both methods are less than desirable but it’s better than an elephant foot 🙁
I’m genuinely impressed by the quality of your blog – it’s informative, engaging, and incredibly well-written!
Hi,
This is not working for me and I’m not sure why. I would be grateful for any advice please. I have a Phrozen Sonic Mighty 8K and need to print a 5mm thick flat slab with 45 degree chamfers on two opposite edges, on the plate.
Using conventional type settings I’m getting elephants foot artefacts, but using your various findings I have managed to reduce it significantly ( thank you) but it is still there. I have then followed your instructons on this blog above for UV Tools and it saves Ok and transfers to the printer Ok but when I try to actually print I get a “Checking”–>”File Error” message on the printer and it does nothing.. I tried it with UV Tools V3.12.3 and have just updated to V4.0.5 with exactly the same result.
I wonder if the problem might be to do with the bottom layers because although I have set it to 3, the program insists on saying that there are 4@0.15
Hey! Thanks for your excellent blog. I’d like to try the script but unfortunately the file is 404… Is there a way to get it back online?