In one of the recent posts I printer a solder paste stencil. The print is challenging as it contains small details, is thin and prints directly on the build plate. Even I use the same exposure on the first layers as did on the other layers, the first layer showed some exposure bleeding.
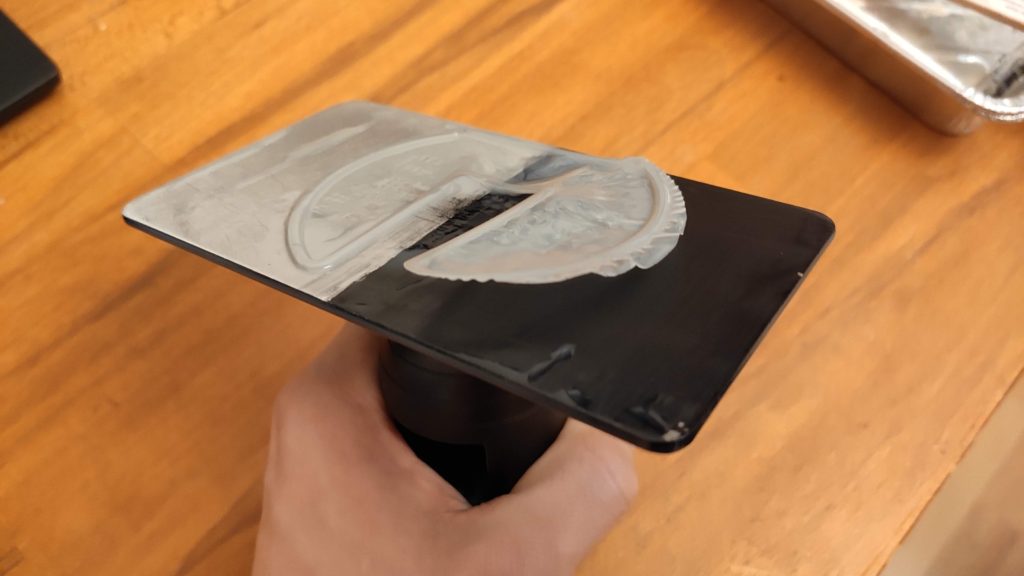
The hypothesis is that the silver surface of the build plate reflects the light, which cures the resin, and therefore more resing gets cured. I was thinking about getting really dark black paint and to paint the build plate. One of my readers, Zemerick (thank you!), brought up that Vantablack cannot be used (as it is a fragile forest of carbon nanotube), but Black 2.0 or 3.0 is just acrylic paint with a lot of pigment. So I got Black 3.0 and painted half of my build plate:

The paint can get be scratched easily (you can see the test scratches), so I was afraid it would peel of. To my surprise – it didn’t. But the test print didn’t stick to painted plate:

Reason for that? The paint is soluble in resin. I got leaking black pigment to my vat, the paint after a 5-minute print was really soft. I tried 2 more prints with roughly the same result.
Since the prints peel off, there is not much to compare and I cannot say if it helped or not.
The half printed on black half.
The half printed on the unmodified half.
Conclusion? None. I still think UV absorbent surface finish on the build mitigates the exposure bleeding. However, I am not sure how to create one. Anodizing would stick but is still too reflective. I could use spray paint, but not sure if it is dark enough and if resin will stick to it. I probably wait until the replacement build plate will be available and then (maybe) try some more experiments.
Recent news: My open letter to the 3D-printing community
I love the 3D-printing community, but I think there is room for improvement. Let's get better in 2023! Read the full letter.
Support my work!
If you like my work (these blog posts, my software and CAD models) and you would like to see more posts on various topics coming, consider supporting me in various ways:
- You can become my sponsor on Github.
- If you prefer, you can also become my Patreon.
- You can buy me a coffee on Ko-fi,
- or you can buy something from my Tindie store (also see below),
- Or you can just share my work!
If you are interested in knowing what I am up to and recent sneak-peaks, consider following me on social media (Twitter, Instagram, Facebook).
My store offers

I launched new tank cleaning kits for Elegoo Saturn, Saturn S, Mars 1, and Mars 3. You can find them in my store.


Glad to help any I can, even if it wasn’t ideal.
I wonder if a sealant over the paint would be worth bothering with. This is extra difficult though, as even the most matte ones tend to be rather glossy. Perhaps a very thin spray coat would be enough to seal it against the resin though.
Telescope forums and such have lots of things to try for making things dark. ( This is how I first heard about Black 2.0: https://www.cloudynights.com/topic/572666-new-flocking-materialpaint/ ) They need the inside of the telescope to be as dark as possible to prevent light reflections so the image is as clear as can be. That specific thread already mentions several different options, and others have more ideas.
Did your plate originally come without any coating? Mine was already anodized black.
I think one of the biggest issues though is going to be finding a coating that doesn’t destroy adhesion. This also makes me extra nervous about the new Pro plate. It is machined to have tiny grooves which greatly increase adhesion, but is bare aluminum and so highly reflective. Any attempts to coat it would likely fill in the grooves. Maybe a thin black anodizing could work.
There are other methods to get it black, but all of them I know of are even more extreme. There’s chemical blackening, such as:
https://www.epi.com/black-oxide/aluminum/room/insta-blak-a-380/
As well as Chemical Vapor Deposition and Spin Coating solutions.
I don’t know of any of those that would be worth trying though, so anodized might be the best we can hope for.
On a related note, I also wanted to try out reducing the gap between the LCD and FEP. To keep at least some sort of protective cover, I planned to use a thin phone protective glass cover. I never did find one the right size, so they would all require trimming, which could be difficult.
Unfortunately, I didn’t get that far. When I went to remove my cover, mine actually did have an adhesive between the cover and lcd. I got very close to getting it off safely ( well, the cover broke pretty much instantly, but I didn’t need that anyways ), but then in the last few mm the screen cracked. It’ll be a bit before I can try again. Next time around I plan to buy the screen without a cover to start with.
I had some other random thoughts that I mostly haven’t been able to test posted over on the reddit sub:
https://www.reddit.com/r/ElegooMars/comments/e2at7i/random_musings_of_a_zemerick/
The dark grey worked out pretty well, you might want to give that a try. The other thing of note I wondered about is using 2 LCDs stacked on top of each other to try and limit the angle of the light. This would make it so the gap matters less, though this obviously wouldn’t really help with your modifications in place.
Hi, You could try some of the industrial paints available. I used to work at an industrial coaters and a standard test was an IPA rub. Most of the coatings are thermoset at around 200C, well within an ordinary ovens range. Look for some Everlube 1301(matt dark grey) or 1201 Black.
I’ve considered this, but finding a material with the right amount of adhesion and very low UV reflections is more work than I really want to do.
Most materials are likely to stick too much, or too little.
The Mars Pro plate pattern may actually be the answer (the pattern, not the raw AL). My experience with it has the adhesion being super strong if cured all the way down the crack, to the point of being hard to remove. If the resin in the crack is less cured or uncured, it becomes easier to remove. This property makes it basically possible to tune your adhesion by tweaking the base layer exposure.
The experiment I plan to run eventually is, pigment some epoxy resin with lamp black (aka. carbon) and apply it to the plate, then press a mold of the Pro plate’s spiral into it.
The hope is the epoxy is UV transparent enough that the carbon absorbs all the light, rather than reflecting it, while the spiral pattern keeps the adhesion reasonable.
Also, be careful since “black” doesn’t actually mean 405nm absorbent. I doubt the anodized AL has much lower reflections than the raw AL.
The black 3.0 is probably mostly carbon, which will absorb really well, but it’s binder acrylic may still be reflective to UV.
Hi
Just followed thread from another blog. I don’t have a sla but I have a suggestion for your problem. Just anodise it. You can easily do it at home with real simple materials. You just need a plastic container a pack of clothing dye (Ritz is what I use here Canada) some acid to clean the aluminum and a power supply. There should be a few hundred Web pages on the actual process. The key thing is that you can give it a real black finish and it can be matte. You can also strip it off and try a different colour. With a bit of practice getting your settings right you can get a finish every bit as good as a Comercial one. Hope that helps as I am very curious about the true resolution of these.
I sanded my build plate (the style with the black coating that came with the Mars about a year ago) to make it flatter. It left bright aluminum in the center. I blackened that section with a product for chemically coloring aluminum which is available in the U.S., Birchwood Casey Aluminum Black. I can’t say whether it is effective for ultra violet. To my eye, after treatment it was about as black as the original coating.
Resurrecting this thread. I have the same idea – have a UV-absorbing layer on my flex plate so that the base layer doesn’t get way over-exposed due to the reflection off the build plate.
My idea – maybe someone has done this before, but I can’t find it on the internet – is to paint a stainless flex plate with matt black paint, then attach a very thin laminated glass screen protector to the flex plate. The glass surface would then be sand-blasted slightly to provide a slightly rough surface for adherence. The UV would pass (and scatter a bit) through the screen protector and be somewhat absorbed by the black paint on the flex plate. To remove the part the flex plate + screen protector would be removed and flexed (the thin glass laminate screen protectors for smart phones are quite flexible).
Many things could go wrong, but it just might work.
Jan I you are interested in my results email me at jhinkey@geminustd.com
I’ve had good luck attaching a brass thin sandblasted plate to a flex plate and printing on it – brass has much higher thermal diffusivity than steel and thus sucks heat away much more quickly reducing elephants foot a bit (that and resin sticks to a sand-blasted brass surface really really well).
Overall custom sandblasting a steel flex plate produces far better adherence to the surface (compared to the standard flex plate surface) thus significantly reducing the required base layer exposure time and thus elephants foot.
John