In the previous blog post, we started the topic of resin shrinkage. We showed how serious it is and we presented a simple yet effective method of measuring the shrinkage amount and compensating for it.
However, the problem is more complex than the two numbers. Anyone who has ever worked with plastic injection molding can confirm this. There is a number of papers, models, and algorithms that deal with modeling shrinkage of plastics after molding. The same, unfortunately, applies to 3D printing as our material shrinks as it cures. What effects does it have? Is there something we can do about it? Yes, there is as we see at the end of the post!
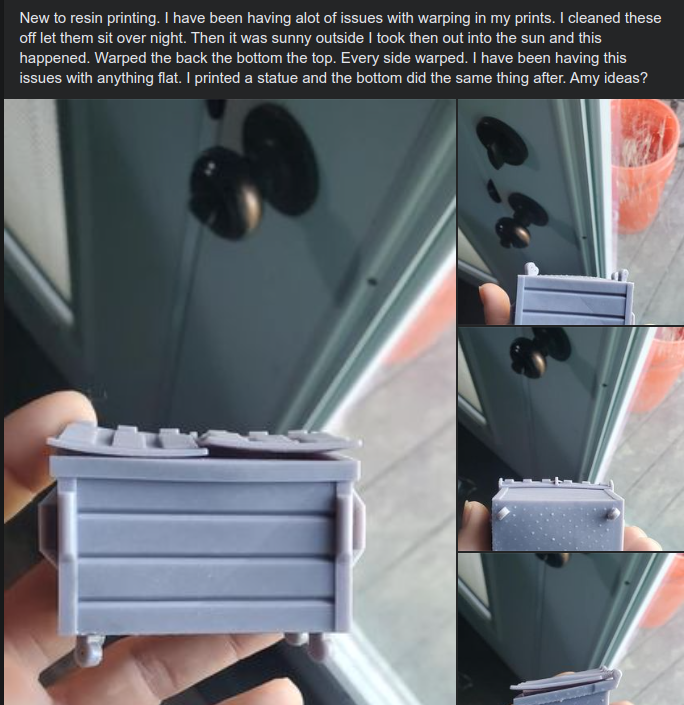
Just to illustrate what we are trying to fight, there are a couple of posts from a single FB resin printing group:


Why simple shrinkage compensation is not enough
You might be wondering: if the shrinkage is linear, why should I bother? There is a nice 90-second video by Stefan from CNC kitchen about warping. Please, watch it before continuing reading. And don’t get scared or confused – the video is about FDM printing. I will explain how it is connected to resin printing right after the video.
Though the video is about FDM printing, the same applies to resin printing as we print layer by layer, and each layer shrinks (just as we observed and measured in the previous post). Though the source of shrinkage is different (plastic cooling vs. curing chemistry) it shrinks the layers and yields the same effect. Just try the tape experiment for yourself.
You probably experienced this – the corners of your model lifted out of the build plate or, even worse, the model was perfect and it warped after a day or two. The last effect is especially noticeable on thin walls. You might have also noticed that sometimes people with magnetic build plates suffer from the steel sheet being bent under the stress of the printed model.
All these phenomena have a common root as explained in the video – the printed layer shrink and thus introduces inner stress to the model.
Fighting the inner stress using common means
When you want to mitigate the lifting corners, there is one pretty straightforward solution on resin prints: put your model on dense, but lightweight supports. The supports are thin and soft so they act as a spring that can compensate for the warping model. In that case, when the model wraps, the supports slightly bend, but they stay attached to both model and build plate.
Why dense supports? People often tend to use sparse but thick supports as they think that will have less clean-up. However, this has a problem – when the model warps and there is a large bridge between supports, the model will be already bend up and it will not properly attach to the support. This, in combination with too cold temperature and insufficient rest times, is the “holy trio of printing failure” people experience according to my findings.
Per-partes layer curing to reduce warping
When you do traditional resin casting, you can add filler to the resin to alter its properties. A filler is usually some powder you mix in. One effect of the filler is that it reduces shrinkage as there is less resin in any dimension to shrink. Similarly like you add gravel to concrete to reduce shrinkage.
Another view on the problem comes from my previous post where I mentioned that there is no shrinkage in the Z-axis direction as we print layer-by-layer and each new layer compensates for the previous one.
Inspired by this, we can actually change the way we expose the layers of our models to reduce warping. The idea is as follows:
- expose the layer per-partes. We will use 3 exposures for a single layer.
- 1. exposure exposes only a number of disjoint dots in the layer pattern (further referenced as seeds or cores),
- 2. exposure exposes bridges between the dots to form a lattice structure,
- 3. exposure exposes the full layer to cure the rest.
The first exposure builds small islands of cured resin. These cores slightly shrink, however, since they are not connected to each they don’t introduce any stress to the model. Then we connect them by short bridges that compensate for the shrinkage of the cores. They also ensure there won’t be any long continuous strands of resin to cure in the last step (as otherwise, they would shrink and we would gain nothing). The last step exposes the rest. See it on example:


To illustrate it on the filler example from the introduction, we first build the filler particles/gravel. Then we add resin/concrete, but we first ensure there is no long continuous strand of resin to cure.
Implementation

To implement this I created a short script for UVTools that takes a slide file and performs the post-processing. It splits each layer into 3 layers and applies a pattern to them. The script is available on my GitHub free for use.
If you are a slicer developer and you are considering implementing some kind of resin-shrinkage compensation, please, reach out to me!
A step-by-step how to use the script is captured in the image series below. Basically, you load your sliced model into UVTools, load the script, set the parameters, and click “Scripting”.
When you want to combine it with other transformations, apply the triple exposure transformation last.

Load you file into UVTools

Select Tools -> Scripting

Load the script file from GitHub and click "Scripting"

The script will run for a couple of seconds

You endup with each layer being separated into three layers. This is the cores' layer.

This is the bridging layer.

This is the full layer. Done. Start printing.
Results
First, I used my calibration pieces to evaluate this approach. I printed them without per-partes exposure and with per-partes exposure with a number of resins with the same settings at the same temperature. There are a few interesting observations:
- overall, the shrinkage amount was less than half compared to the other samples. This is worse than I expected, but I will discuss a possible explanation of this below. Nevertheless, it is a good result.
- I measured the models before and after curing. The per-partes exposed models didn’t change the exposure much compared to the normally cured. That means, that out of the box the per-partes models are better cured and still have lower shrinkage.
- I tested 100µm, 200µm, and 500µm initial particles with 25, 50, 100 % spacing. The best performing were the 200µm particles with a spacing of 100µm. They reduced the shrinkage the most.
- The particle pattern is visible by the eye, but the surface of the models is completely smooth. So it seems just to be a change in color that also fades after a week.
- The same thin-walled models managed to preserve their shape with per-partes curing even 2 weeks after printing. This was not the case with regularly exposed models. Therefore, I think this method prevents the buildup of internal stress in the models and ensures better dimensional stability.

The pattern visible on vertical face of the model

The pattern (darker dots) on a horizontal wall
There are two possible explanations for some shrinkage still being present. One is that the shrinkage force is large enough, to actually pull the initially cured cores closer together. That would explain why there is still some shrinkage and it is (very) roughly proportional to the spacing between seeds. Also, it is possible that the happens sometime after curing and I don’t use enough wait time between the exposures.
The second explanation is that this is all caused by residual resin between the layers. Due to the current limitations of the dummy Chitu control boards, we cannot perform multi-pattern exposure with UVTools. Therefore, we have to lift before each part of the exposure. This might cause there is a thin film of fresh resin over the already cured parts. This film gets cured and thus, causes some shrinkage.
Conclusion
The per-partes exposure seems to be a good way to reduce the internal stress in models, and thus, improves the dimensional stability of the printed models. It doesn’t remove all shrinkage, but the remaining shrinkage can be compensated with simple scaling. There is, however, some limitation on what experiments we can perform coming from the Chitu control boards.
Is this method worth it? It depends – on top of all the upsides of this method (effectiveness, simplicity of implementation), there is one downside. It triples the print time.
Nevertheless, I have a couple more ideas on exposure patterns that I would like to try in the future. Stay tuned and I will appreciate your feedback and thoughts in the comments.
Recent news: My open letter to the 3D-printing community
I love the 3D-printing community, but I think there is room for improvement. Let's get better in 2023! Read the full letter.
Support my work!
If you like my work (these blog posts, my software and CAD models) and you would like to see more posts on various topics coming, consider supporting me in various ways:
- You can become my sponsor on Github.
- If you prefer, you can also become my Patreon.
- You can buy me a coffee on Ko-fi,
- or you can buy something from my Tindie store (also see below),
- Or you can just share my work!
If you are interested in knowing what I am up to and recent sneak-peaks, consider following me on social media (Twitter, Instagram, Facebook).
My store offers
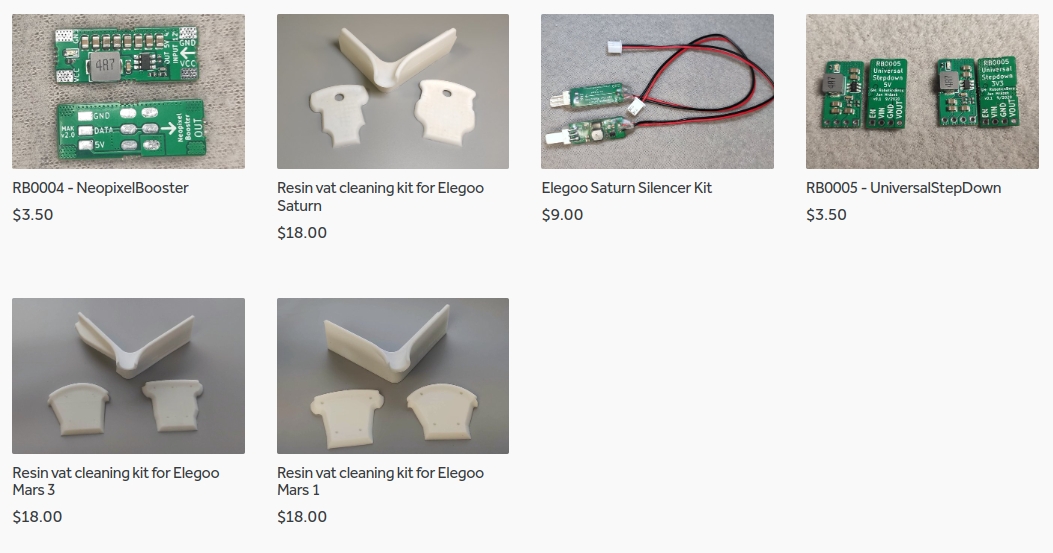
I launched new tank cleaning kits for Elegoo Saturn, Saturn S, Mars 1, and Mars 3. You can find them in my store.
Related Posts
- Multi-planar Slicing for 3D Printers – For Both FDM and Resin
- Open letter to the 3D printing community: Let’s be better in 2023! What should we do?
- Continuous Printing On LCD Resin Printer: No More Wasted Time On Peeling? Is it possible?
- About the Successful Quest For Perfect MSLA Printer UV Backlight
Really clever! I’m hopeful that simplifying the pattern to only two steps might be a viable compromise.
I have several ideas for new patterns (some of them are even 3D and leverage cross-layer curing). However, what would speed up the process most would be the ability to perform multiple exposures without lifting the build plate. This is the real speed killer at the moment.
UVTools Multiple Exposure Testing either doesn’t lift at all, or lifts by a very tiny amount.
Another amazing contribution! Thank you. I have preordered the Peopoly Forge which uses the Vlare Core board, and multiple exposures per layer is apparently one of the benefits of the board. Will be interesting to see how flexible the board really is and to push the boundaries of these and other methods.
Just sponsored you, your contributions to this hobby are valuable and are helping not only individuals but the hobby as a whole. Thank you.
Ps: when the forge arrives I’d be happy to help test things for you.
Dude wow what a great read and I will implement. I gotta say it would be really interesting to have you create a like almost diy 3d printer. Like you either buy a Saturn and take motherboard out and replace it with yours. Or just make a diy resin printer thought off by a creator for creators. Also note thinking on it could you just gut a Saturn and replace the board??? Do away with the chitubox???
Actually, it makes sense that this reduced tension around 2x and not eliminated. You’re still doing turns where you light it all up and connect lots of small pieces together. During that turn you create tension proportional to the amount of new pixels you created in your lattice in each dimension.
One other very important thing to note is that if you’re lifting up and lowering each time, each time you are also getting some new resin on top of the old one where you’ve printed. So when you light up the whole scene at the end you create a small additional superthin layer of resin. That layer will not provide much tension and distort the model, but I would guess that it will be as highly tensioned as in vanilla case and it’s going to a weak point in the final print in terms of strength and toughness.
“The best performing were the 200µm particles with a spacing of 100µm. ”
That’s 4px for initial grains and 2px for free space.
Why the default values in your script are 11px and 9px then?
Also, I found that scrips produces really funny patterns in intermediate layers when you change the default values to something else. I’m not sure is it intended or not.
Hi! The reason for that is that I experimented a lot, and I basically never used the default values. When publishing, I didn’t think about updating them.
Could you give me the numbers that yield “funny” patterns? I can look at it. It is for sure possible there is a bug in the script.
Hello, Jan.
I was using your script on Siraya Test Model (https://siraya.tech/pages/siraya-tech-test-model).
CTB file – https://drive.google.com/file/d/1zgpD1jNYXCX9geAYu0PreMompzoygYam/view?usp=sharing
Here’s what I define “funny” patterns and the settings that produced them.
a) 6px/3px settings.
Layer 0 – https://imgur.com/1xl62xF
Layer 1 – https://imgur.com/DaGW4nz
b) 9px/4px settings.
Layer 0 – https://imgur.com/jddVsoR
Layer 1 – https://imgur.com/l4Jh9ll
Notice, that L1 in both cases looks strange: for 6/3 that vertical interference pattern, for 9/4 it looks like there are missing pixels in bridging layer.
Thank you!
Hi Jan!
Thanks for this article, really useful. However, when I load the script into UVTools, I get the following error message:
The method “void Scripting()” was not found on script, please verify the script.
UVTools 3.5.x and the latest 3.6.3 have the same problem on Win64. Could you fix this somehow?
I apologise, Jan! Please ignore my previous post. I downloaded the script the wrong way. There is nothing wrong with it.
Hi,
I have an issue. The script is applied from layer 0 meaning it isn’t a proper base for the print. On your screen shots the 0 layer is a full white layer without the pattern but on mine it is patterned. My prints using this script keep sticking to the fep and not the build plate when they are fine without the script. I tried to start the script at layer 7 for example but then UVTools just crashes during the ‘Scripting’ process.
Any help would be great thanks.
Jay
Hi, I designed the process such that it should be applied from the first layer. Could you share a screenshot of your model? The dot pattern is quite dense and hasn’t caused me adhesion issues so far. So I am wondering what your model looks like.
Hi
I did not use the script as of yet, but my printer Nova3D Bene4 Mono, is perfectly fine with multiple exposures per layer. Is there any trick or setting I can employ to prevent plate lifting between same layer exposures?
Me again
Just something I want to wrap my head around…
Is the overlap between patterns not an issue? From appearance, it looks like the overlap areas will be exposed three times? Is that not what causes your patterns on the prints? I am sure what you try and achieve is sound, that is why I would like to try it out.
I am curious also about warping weeks or months after printing. I had some thin walled prototypes of an injection molded product that warped like crazy over time.
Wondering if this is all due to internal forces moving it over time and if there is anything to do about it..
Hi Jan,
Thank you for this excellent script and novel solution to the resin warping problem. I would like to apply this to only a range of layers in my slice file (0-300 of a 900 layer file), however when applying to only the first 30 layers in the script settings, the excluded layers are removed from the model. Could you suggest a way to modify the script and/or post combine the modified slice with the original slice to achieve this result?
I am proficient at writing c# but not at all familiar with the UVTools API. If you point me in the right direction I would be happy to implement the change and submit a PR back to your github script.
I tested this on Elegoo Saturn 3 Ultra. seemed like the part was stretched 3x the height, meaning the layer height wasn’t transformed properly. Any suggestion to this issue?
Alternatively, do you know what newest printer is most compatible with your script?
PS: always admire your work.
Best regards,
Thomas Huang
I had the exactly same issue. Would love to know how to fix/work around it!
Hello
Very interesting idea. Congratulations. I’ve tried it out. I print stamps directly onto the build plate, and unfortunately, the product always warps a bit. However, with this script, the printing time increases threefold. How could it be solved so that the script works only on the first few layers, not on all layers? I think in this case, the warping should also decrease.
Thank you
Gabor Halasz
When I want to load the script in UVtools 4.3.2 I get this message:
(160,82): error CS1061: ‘FileFormat’ does not contain a definition for ‘SupportsGCode’ and no accessible extension method ‘SupportsGCode’ accepting a first argument of type ‘FileFormat’ could be found (are you missing a using directive or an assembly reference?)
Where can I fond the scripting manual foor UVtools?
The property got renamed:
the property SupportsGCode was renamed to SupportGCode