The summer is over, and winter is near in the northern hemisphere. What does it mean? The resin printing groups are getting full of questions regarding suddenly failed prints. Why is it so? What can you do to prevent the failures? Note that you should continue reading even if it is not cold outside but you experience print failures. In this post, I will summarize all my findings on various ways a resin print can fail and tell you what you can do about it. The advice I present is no random guess; it is formed from many experiments, and all of them are supported by data (you can read all my other posts that explain the topic in depth).
I know this isn’t a flashy TikTok/Youtube video, and reading this post will take you about 15 minutes. But trust me, I think reading this thoroughly can save a lot of headaches, time, and money in the resin wasted on failed prints.
The short summary is as follows:
- read this blog post that explains what goes wrong,
- and follow this blog post that explains what UVTools post-processing passes to add proper rest times.
- If you are willing to spend money, ensure that your resin is at a constant temperature during the whole print and across prints (e.g., via heater)
If you want the full story, continue reading:
How do resin prints fail in the first place?
Before we dive into the causes of failure, we should first understand what exactly happens when a print fails. Most commonly, you can see several types of failure:
- The print didn’t stick to the build plate properly. That is, the build plate is empty, or the sides of the model are lifted from the build plate. It can also happen that half of the model is printed nicely, but then it gets stuck to the bottom of the build resin tank.
- The raft or bottom of the supports is printed nicely, but then the support structures or models are missing. They miss completely or only part (usually the middle is missing)
- Everything was printed, but the model has horizontal holes, or the layers are delaminated.
- The support structures printed just fine, but the model is missing or damaged/torn. Another appearance might be that the model is broken otherwise and the break line isn’t parallel with the build plate.
- Lastly, the model might feature flattened areas on the overhangs, or the overhangs have separated layers.

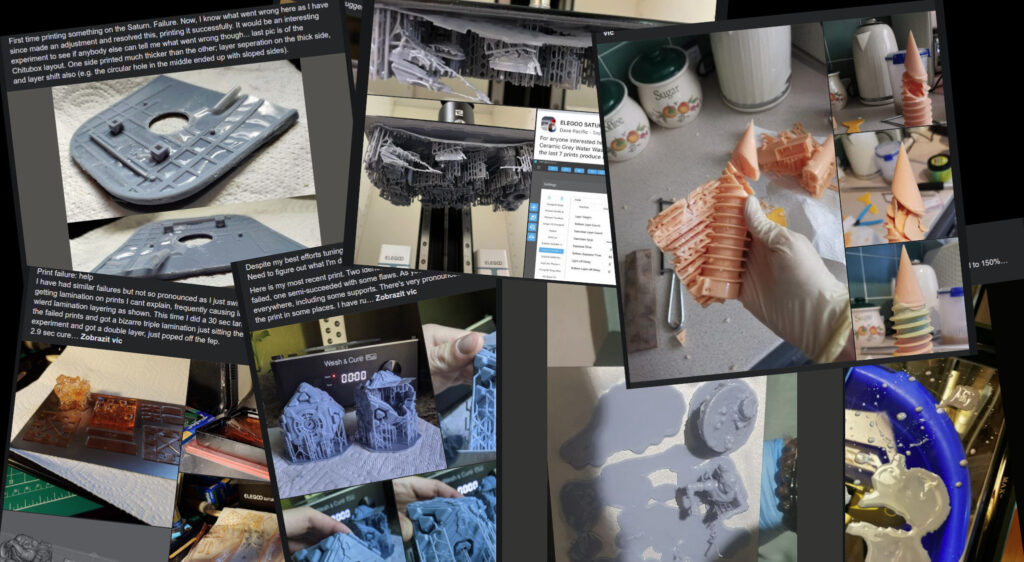
Example of failure 1; source FB Saturn Group

Example of failure 1; source FB Saturn Group

Example of failure 4; source FB Saturn Group

Example of failure 4; source FB Saturn Group

Example of failure 4; source FB Saturn Group

Example of failure 1; source FB Saturn Group; The given advice is really bad as we see later.

Example of failure 3; source FB Saturn Group. The hole happened when the person pour in (cold) resin. It got thicker and delamination occured.

Example of failure 2; source FB Saturn Group

Example of failure 2; source FB Saturn Group

Example of failure 4; source FB Saturn Group

Example of failure 1; source FB Saturn Group

Example of failure 4; source FB Saturn Group

Example of failure 1; source FB Saturn Group

Example of failure 1; source FB Saturn Group

Example of failure 3; source Saturn FB group

Example of failure 4 - torn peices; source Saturn FB group
Failures 1–3 have a common cause – a layer wasn’t properly formed. As you know, the printer prints layer-by-layer. It lowers the build plate such that it is a layer height over the bottom of the resin tank; it shines the UV light through the LCD. The resin cures. Then the printer has to peel the layer by lifting the build plate so the new resin can flow below, and then the cycle repeats.
The print won’t stick to the build plate when the base layer isn’t properly formed. And the whole model ends up “stuck to FEP”. When normal layers aren’t properly formed, the consecutive layers don’t have anything to stick on; thus they also end up “stuck to FEP”. I use the quotes on purposes, ale the main reason for the failure isn’t large enough peel force but improperly formed previous layers. We will explore how this can happen later.
Failure 4. indicates that the support structure was weak enough to actually hold the model when peeling. When the model is broken, it indicates that the resin wasn’t properly cured and the whole model was just too weak to support itself. Note that it is often sufficient that this defect happens somewhere in the bottom layers, and then the consecutive layers have nothing to attach to.
Failure 5 indicates that the overhanging areas were not supported. That means some islands have nothing that they can connect to. Thus they remain stuck to the bottom of the tank.
Now that we covered the most common ways of failure let’s analyze what causes them and how we can prevent the failures.
How to ensure a layer is properly formed
The resins you use contain UV-blocking pigment that prevents the resin from curing deeply. If there was no UV-blocking pigment, you wouldn’t be able to print overhangs as they would just cure-through. You would also lose a lot of details. How much the resin blocks UV light can be measured by a simple experiment I described in depth in a previous blog post. I advise you to read through it if you want to understand it deeply. What we need just now is that most of the resins cannot be cured much more deeply than 250 µm. The high-resolution resins (aka “8k” resins) often even less – about 100 µm.
What does this mean? First of all, you cannot form layers thicker than this number. When the light shines through the resin, it cannot reach the previous layer, and the layers don’t fuse together. And here comes the biggest pitfall. Even when you set a layer height of 50 µm or less in your slicer, your printer might struggle to form such a thin layer. It takes a very large force to squeeze resin into such a thin film. Unfortunately, the consumer-grade printers most people use have very weak construction, and they struggle to form a thin layer when there is a large cross-section, or the build plate is near. Again, the details with experiments, numbers, and graphs are presented in the already mentioned blog post.
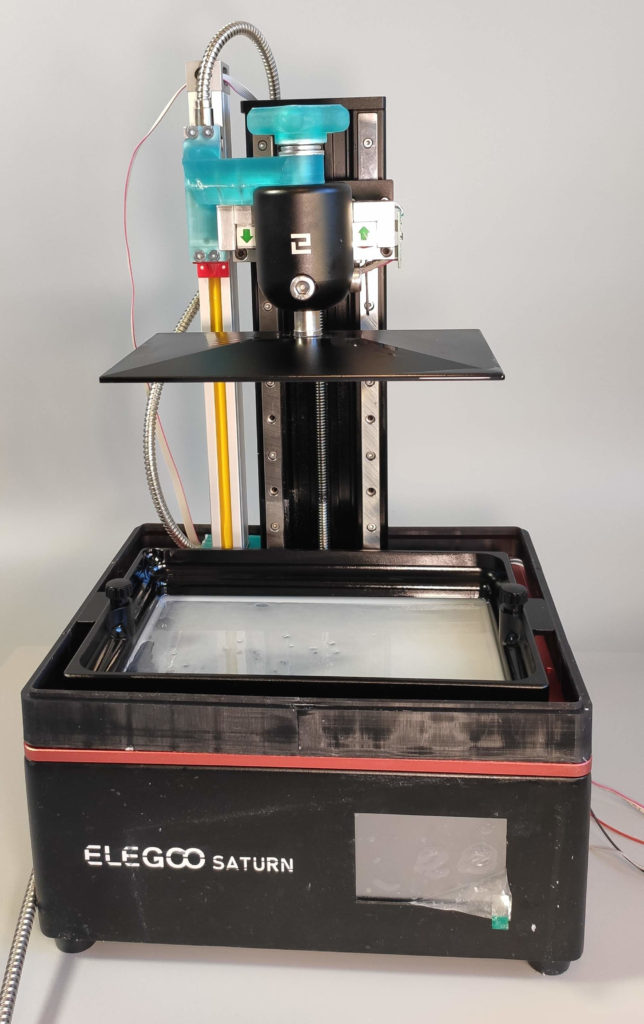
The modification of the Saturn

The modification of the Saturn

The modification of the Saturn

The forces during printing of a small piece. Note that the actual force is double this value as there are two force sensors.

The problem observed - printer squeezing resin even when the exposure is already on


Simulation of peeling. Note that the visualisation is exaggerate.

See that the weak point is actually the base plate, not the Z-column.
So when your printer struggles to form a thin layer, the layer isn’t properly cured, and it won’t stick to the previous one. And now you have print failures – one of the categories 1–3. When it gets cold outside, the resin is thicker, putting more resistance and the printers struggle more to form the layer. This is why we see more failures in the winter. Also, as the resin is colder, the curing reaction happens slower. Thus a slightly longer exposure is needed. I don’t have an experiment to measure how much longer is precisely needed. For some resins, I have managed to establish by trial&error that they need 10% more exposure when they have 18°C compared to when they have 24°C. So actually, the exposure change is actually not that much. However, in some cases, the difference might be enough to cause failure 4. The recently popular “cones of calibration” by TableFlip Foundry are a pretty good test for the strength of cured resin and the strength of supports. Note that they are, in my opinion, pretty bad as an overall exposure calibration tool. They just estimate pretty well the strength of the resin, but on the other hand, people often use too long exposure based on this tool.
When you see failure 2, there are also other mechanics that we need to consider. When the resin is thick, it doesn’t only resist sinking but also lifting the build plate. It is then possible that when you lift the build plate to peel, the printer bends instead of detaching the just-formed layer from the bottom of the tank. In that case, the following layer has zero thickness, and thus it is not formed. Consequently, several layers are missing, but then one of them finally peels (when the build plate is high enough to overcome the bending). Unfortunately, that means that the rest of the layers have nothing to fuse to. Note that sometimes, people claim this can happen due to FEP film stretching (as it is not tensioned properly). To be honest, I don’t think this is the real cause, but I have no data to support this. Based on how flexible the common printers are, I suspect that the printer bends more. So, I think there is no need to over-stretch the FEP film or re-tension it when you see failures.
Since we now understand, what is the cause of improperly formed layers, the obvious question is – how to make our printers properly form thin layers? Two approaches work best when combined. The one is obvious – heat the resin to a temperature, so it is thin again. The second method is actually even more effective: Add rest times before curing, which give the flexed printer time to squeeze the resin. This method is highly effective, as shown in detail in the already mentioned blog post. If you see failure number 2, you can also consider increasing the lifting distance when peeling to overcome the flex of the printer and allow it to properly peel the layer.
There is, however, no point in adding large rest times as it prolongs the print time. As the resistance depends on the layers’ shape and cross-section, it actually makes sense to define the rest times on a per-layer basis. Fortunately, UVTools can do this for you. I have written a blog post that shows how to use it for adding rest times. How long should the rest time be? It really depends on the printer. Also note that if you use proper rest times for the base layers, you only need 2-3× the base exposure for the bottom layers to achieve perfect bed adhesion.
If you see failure 5, then I suggest using UVTools to identify islands and support them more.
Other advantages of rest times
Not only that the rest times prevent print failure, but they also ensure that your print ends up crisp. If you have ever seen a rough texture on your prints, you experienced blooming that I describe in detail in the original post and a follow-up. Blooming is formed when you expose resin that is still being squeezed by the build plate. The partially cured resin forms a rough texture. Allowing the build plate to settle removes this problem. Details & experiments can be found in this blog post.

Example of blooming

Example of blooming

Extreme case of blooming

Extreme case of blooming

Extreme case of blooming
Also, the same mechanics apply to building up elephant foot. If you add sufficient rest times to your bottom layers, the elephant foot is completely gone without any compensation. More details about this procedure with more data and reasoning can be found in this blog post.
Eliminating both blooming and elephant foot is essential if you want to achieve nice surface quality and dimensional precision.

No elephant foot.

The gears side-by-side - one with elephant foot one without

The gears side-by-side - one with elephant foot one without

No elephant foot.

See - no elephant foot.

See - no elephant foot.
A note on waiting after cure
UVTools also allows you to set a wait time after the cure. The purpose of this time is to allow for finishing the curing reaction, aka “to give some time for the monomers to tangle and gain strength”. Adding 1-2 seconds can actually improve the strength, and thus, you can address failure number 4 with this approach. However, I only have data that shows this is effective, I have no data to tell you how much strength the resin gains if you add the rest after cure.
Note that adding the rest after cure allows you to use a pretty drastic peel cycle (big acceleration and lifting speed), as properly cured resin sticks less and is much more durable. So, if you aim for the popular “vroom settings”, adding a second to wait can actually improve the results dramatically and allow you to achieve higher printing speeds.
What you should be aware of when heating the resin
As we showed, the cold resin is thick, gives much resistance and it is less reactive. So heating the resin is a viable way to overcome failures and also to speed up printing speed (as you need less rest time). Most manufacturers recommend 25°C, and some engineering resins recommend 30°C. However, note that it is more reactive as the resin gets warmer. This means it needs less exposure time (but again, it seems that the difference of 8°C corresponds roughly only to ~10 percentage points of the exposure). It also seems that the amount of cross-pixel exposure slightly increases. I don’t have precise data yet as it takes a lot of samples to be printed. If you would like to determine the amount of cross-pixel curing, you can read a blog post on the topic of compensating for resin shrinkage and measuring cross-pixel curing.

Example of heater induced banding. After removing the heater, the banding is gone. This is why it is important to change the temperature slowly.

Heater induced banding. Source: Saturn FB group

Another example of heater-induced banding: Source Mars FB Group
Given this, it is actually not ideal to preheat the resin, pour it into a printer, and print. The resin will get cold and thick again, and you will probably see the decreased print quality on the top part of your models. The best is to use a heater with a temperature controller. However, I recommend getting a PID-controlled one or if you only use a dumb switching one, make sure that the hysteresis is quite small. Otherwise, you will see bands on the prints as the temperature of the resin changes (see photos above). So far, the best heating solution has, in my opinion, Peopoly Forge, which has a heater built inside the resin tank. That transfers the heat efficiently a smoothly enough. For my other printers, I use REX-C 100 controller and a cheap heater core (note that the links are affiliate; it costs you nothing and helps support this blog). I also guess heat bands wrapped around the resin tank can be effective, but you have to be sure that the temperature is stable otherwise, you will see banding on your prints.
Note that going with the temperature too high isn’t good as most resins have a tendency to soften, and thus you get weaker supports, and your prints are more suspectable to failure number 4. I also experienced some resins being extremely reactive and rapidly cross-pixel curing when the temperature was over 40°C. However, I don’t have data to quantify this effect yet.
Also, be aware of pouring cold resin into the print. It will cool down the print and in the better case, there will be a visible band, in the worst case your layers will delaminate.
Common myths regarding prints failures
Unfortunately, people often don’t properly mark when they think something is true and when they know something is true. They also want to be helpful. However, the combination of the two leads to giving wrong advice and spreading misinformation in the resin printing community, in my opinion. Based on what we learned in this post, let’s go through some of the common advice that is wrong or at least incomplete:
- Usually wrong advice: You have your build plate leveled wrongly! People are very opinionated about the proper leveling of the build plate. Even it is such an easy and straightforward task. (I know that I probably made some people furious). Yes, if your prints fail on one side of the build plate, then you might have leveled wrongly. But that’s so uncommon. The only time I had leveled wrongly was when I accidentally hit a corner of the build plate with the printer’s cover that tilted it slightly. If you allow the printer to settle, there is about 200 µm of tolerance for the first layer to properly stick.
- Usually wrong advice: Sand your build plate! It can actually damage the build plate. I don’t say that a rough surface leads to better adhesion, it does, but usually, there is more than enough adhesion to the build plate when you, again, let the printer settle in position. People often claim that the build plate is not flat enough. If you can’t measure how curved your build plate is or have proper tools (a mill, surface grinder), don’t sand it. You will probably only make it worse. Unless you have three surfaces that you rub against each other, you cannot form a plane by hand without measuring (see why). As we learned, you aim at a surface that is at most 100µm out of the ideal plane. When you can’t measure how well you sanded, you will probably only turn your build plate’s surface into a part of a sphere.
- Usually wrong advice: Just bump the exposure! We learned that exposure isn’t the only parameter determining print success and quality. Overexposing usually doesn’t solve the problem, and at best, it will help you at the cost of having a poor surface. So, increasing it won’t help much unless you use surprisingly low exposure. This especially applies to having 30+s base exposure. For most resins, 2-3× the base exposure (that is about 10s) is more than enough. Why? Explained in detail in this blog post. With Siraya Tech Fast at 25°C I use the following exposures:
- Elegoo Saturn: 2 base layers, 7 s base, 3 s normal
- Peopoly Forge: 2 base layers, 3.5 s base, 1.8 s normal
- Really bad advice: Use dry PTFE lubricant on your FEP! People think that the peel forces are huge and that resin sticks firmly to FEP. This is not the case, as the graphs below show (the graphs are measured using a modified printer – see the original post). Adding a lubricant, therefore, doesn’t eliminate the main cause, and also, the lubricant can get between the layers of the model and cause them to not stick. You have no means of ensuring that the lubricant will stay firmly attached to the FEP film on the bottom of the tank and it won’t be transferred to the currently formed layer.
My advice is: If someone gives you advice, ask them if they can explain why it should help. If they can’t, then the advice is probably only a conjecture, and it is, unfortunately, most likely to be wrong.
The ultimate checklist for successful resin printing
I am sorry about this clickbaity heading. There isn’t a “single setting that works always,” and some special cases require different settings. Also, if you just skipped here, I suggest you reading the rest of the post first, as it will allow you to understand why your prints fail. However, to ensure you have a successful print every time, there is a checklist you can follow:
- Exposure is not the single most important factor. Print it with sufficient rest times to avoid blooming if you run an exposure test. If there is a blooming, you can wrongly interpret it as overexposure. And it doesn’t kill you if the test print prints 15 minutes instead of 8.
- Ensure that you print at a constant temperature – the same as you used for your calibration prints. The best temperature for consumer-grade printers is between 22-30 °C. At that point, the resins are reasonably reactive and reasonably thin and don’t soften, so they can form strong enough support structures. Also, if you keep it constant across prints, you will have predictable results.
- Note that an improperly controlled heater might cause horizontal lines as the reactivity of the resin changes with temperature, so some layers overgrow, some not based on the temperature when the printer was printing.
- Experiment a little and find rest times for your printer that ensures the build plate settles before exposure. This makes the layer stick well together and prevents blooming. If you are in a hurry, add the rest times at least for the bottom layers to get perfect adhesion.
- To add proper rest times, use UVTools.
- If your prints fail in the middle, increase the lift distance.
- If you print large cross-sections or hollow objects, you will either have to add ventilation holes or very long rest times. If you don’t do so, you will probably see holes at the same height where the object is.
- This will make a lot of people mad and furious, but if you just want to have success, I think that the best way to support a model is to use very lightweight but very dense support structures, just like I show in this Twitter thread.
- If you want to make dimensionally precise components, don’t forget to compensate for shrinkage and exposure bleeding.
Hey, could you just provide a profile and don’t bother us with reading?
The simple answer is – I don’t want to, and I cannot. First, why I can’t. The settings depend on the resin and printer. There are too much data to collect and present. The second reason is that if you have to come up with a custom profile, you actually have to understand the underlying mechanics, learn, and become better at resin printing. I know that thinking hurts, but it makes you better!
Making better community
I care a lot about improving resin printing and educating the community. This is why I support all my findings with data; where I only have a conjecture, I try to clearly mark it. If you find this useful and you see someone else struggling, please, don’t give him a text answer but instead link to this blog post.
Why? When you give solutions without explanation, people don’t learn and blindly follow advice. That often leads to following the wrong advice. Also, this blog post for sure contains some errors; however, there is a discussion below where we can discuss, share opinions, and learn. When these discussions happen in comments on Facebook, they get lost. By linking the blog post, you not only share my knowledge but also the knowledge of the others that commented. There are often some interesting observation and experience in the comments.
Recent news: My open letter to the 3D-printing community
I love the 3D-printing community, but I think there is room for improvement. Let's get better in 2023! Read the full letter.
Support my work!
If you like my work (these blog posts, my software and CAD models) and you would like to see more posts on various topics coming, consider supporting me in various ways:
- You can become my sponsor on Github.
- If you prefer, you can also become my Patreon.
- You can buy me a coffee on Ko-fi,
- or you can buy something from my Tindie store (also see below),
- Or you can just share my work!
If you are interested in knowing what I am up to and recent sneak-peaks, consider following me on social media (Twitter, Instagram, Facebook).
My store offers
I launched new tank cleaning kits for Elegoo Saturn, Saturn S, Mars 1, and Mars 3. You can find them in my store.
Related Posts
- Multi-planar Slicing for 3D Printers – For Both FDM and Resin
- Open letter to the 3D printing community: Let’s be better in 2023! What should we do?
- Continuous Printing On LCD Resin Printer: No More Wasted Time On Peeling? Is it possible?
- About the Successful Quest For Perfect MSLA Printer UV Backlight
Thank you very much for your detailed posts on the subject of resin printers! I think it’s great that you not only say what can be done, but also explain it in detail. I would already call myself an experienced printer, but your contributions have improved the quality of my print results once again!
You and I think alike, on almost everything. Reading your articles is like a summary of the past couple of years of the help and advice I spread on Facebook.
Wonderful information!
Given you have provided some strong data which indicates how much resin viscosity contributes to build failures, have you experimented with increasing resin temperatures?
Well, since there is a whole section “What you should be aware of when heating the resin” the answer is yes. And I even recommend printing the resin at higher temperatures.
Some more information as to how you made your heater would be great!
Using resin with very low viscosity makes it possible to use cheap printers with weak z stepper motors. Add a proper nichrome wire around the vat and two w1209 temp controllers for fault tolerance and you have Elegoo S2’s print 40+ parts of 3/4 inch diameter vertically without breaking a sweat.
Hi Jan I got myself a silicone belt heater (80w 220V). I have a spare cheap thermostat that shuts off exactly at set temp and has 1°C minimum hysteresis on the way down. I’m gonna make some test before my first print setting the thermostat at 27°C and see how long does it take once it shuts off to reach 26° and back to 27°. In your article you said that 8°C are around 10% exposure. So theoretically, if I can maintain my temperature in the -2/+2°C range will I see banding?
Thank in advance
I also don’t know the thermal conductivity of the resin but I can guess that when heating the full vat before printing i might overheat the resin near the edges of the vat while at the center will still be colder…I’m wondering if making a custom blank (no light) gcode to just lift and retract the buildplate (say at 5 mm height) every minute or so would make sense…
Thanks again for your work!
Give it a try and see for yourself. It depends a lot on the setup and thermal momentum of the resin tank so it is hard to make educated guesses what temperature fluctuation is fine and which isn’t.
I’ve set my thermostat at 29°C since i’m reading the temperature near the edges of the vat (internally in contact with the resin.
Once at set temp I lift and retract the build plate a couple time before printing.
I’ve been printing great so far!!
Thanks again for your precious advices
can you post a link to the heater model that you selected and maybe a picture of how you installed it around the tank? New to this 🙂 Thanks!
> I know that thinking hurts, but it makes you better!
You should paint the first part red and put it as a name of the article.
Great job!